How to Mount Your GPU Vertically (And Why You Might Want To)
Vertically mounting your graphics card has become a popular trend in the PC-building community. While it doesn’t typically offer any performance advantages, it’s all about aesthetics. Seeing your GPU’s detailed design and glowing RGB lights through the side panel can elevate your build to the next level. In the past, flipping your GPU vertically was a challenging process that required significant time and expense. Today, with the right tools and kits, it’s easier than ever. Here’s how you can accomplish it and what to consider before getting started.
Ensure Your Case is Compatible
Before you dive into the process of vertically mounting your graphics card, or as some would say, “grafikkarte vertikal einbauen zu nahme am deckel,” it’s crucial to verify whether your PC case supports this setup. While most modern GPUs can be mounted vertically using a riser cable, the limiting factor is often the case itself. Not all cases are designed to accommodate vertical GPU mounting natively.
Some PC cases come with built-in support for vertical mounting, making the process straightforward. These cases usually include pre-installed brackets or dedicated slots for vertical GPU placement. However, if your case doesn’t support this feature out of the box, you’ll need to explore aftermarket vertical mounting kits. Additionally, check if there’s enough clearance to mount the graphics card vertically and still fit the side panel. This is especially important if your GPU is large or your case is compact.
Always double-check the compatibility of your case and mounting kit with your GPU, considering its dimensions, weight, and cooling solution. If your setup isn’t compatible, you might need to upgrade your case or explore a more custom solution.
Why People Choose to Vertically Mount Their GPUs
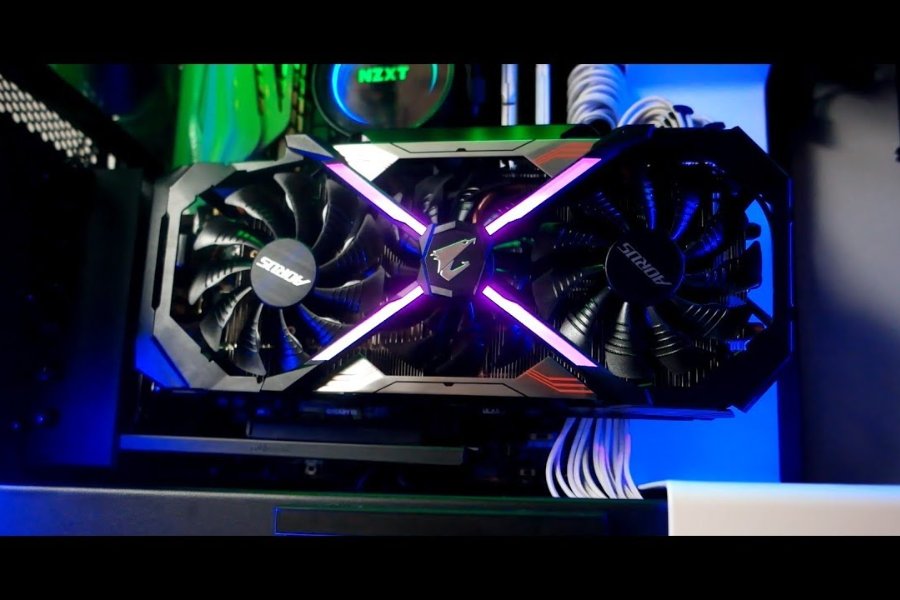
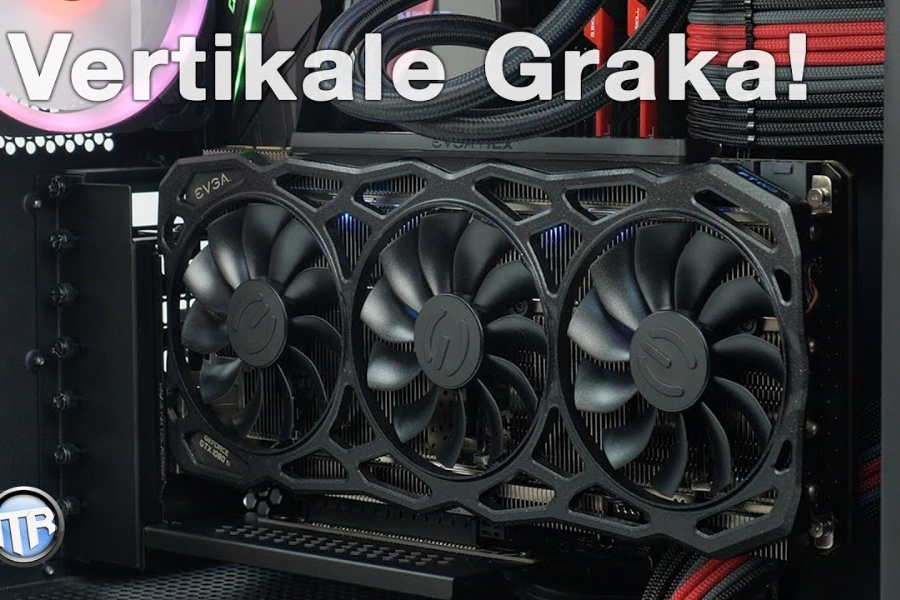
The primary reason people opt for vertical GPU mounting is aesthetics. With the rise of tempered glass side panels, showcasing your build’s internal components has become a major focus in PC design. A vertically mounted GPU positions the card’s fan shroud and RGB lighting in full view, creating an impressive visual impact. For many, the appeal of a clean, professional-looking build outweighs the minor downsides.
Another reason is to combat GPU sag. Heavy graphics cards can bend over time when mounted horizontally, leading to an uneven appearance and potential strain on the PCIe slot. By mounting your GPU vertically, you avoid this issue altogether. However, it’s important to note that vertical mounting can negatively affect airflow. If your case doesn’t have adequate ventilation, especially near the side panel, the GPU might struggle to stay cool. This is particularly true in cases with tempered glass panels that block airflow.
If you have a mesh panel or side-mounted fans, airflow restrictions may be less of a concern. In rare cases, vertically mounting the GPU might even improve cooling performance, but this depends entirely on the case design.
Steps to Vertically Mount Your GPU
Now that you’ve decided to vertically mount your GPU, or “grafikkarte vertikal einbauen zu nahme am deckel,” here’s a step-by-step guide on how to do it. There are three main methods:
- Using a Case with Built-in Vertical Mounting Support
- Installing a Third-party Vertical Mounting Kit
- Using a Remote Mounting Bracket and Riser Cable
Let’s explore each option in detail.
1. Cases with Built-in Vertical Mounting Support
If your case supports vertical GPU mounting natively, this is the easiest option. Start by consulting your case manual or the manufacturer’s website for instructions specific to your model. Most cases with vertical mounting support include pre-drilled slots or brackets for the GPU and come with a riser cable as part of the package.
Steps:
- Remove your graphics card from the motherboard if it’s already installed horizontally.
- Locate the vertical mounting bracket inside the case. If necessary, remove the existing PCIe slot covers.
- Connect the riser cable to your motherboard’s PCIe slot.
- Secure the GPU to the vertical bracket, ensuring it aligns with the riser cable and power connectors.
- Double-check the fit to ensure the GPU isn’t pressed too close to the side panel, which is a common issue when you “grafikkarte vertikal einbauen zu nahme am deckel.”
Once everything is connected, boot up your PC to confirm the GPU is functioning correctly.
2. Third-party Vertical Mounting Kits

If your case doesn’t support vertical mounting natively, a third-party mounting kit is a great alternative. Brands like Cooler Master, Lian Li, and Phanteks offer kits designed for compatibility with a wide range of cases.
Steps:
- Begin by removing any add-in cards, PCI brackets, or obstructions near the GPU slot.
- Install the vertical mounting bracket from the kit. Most designs are tool-free, so you can secure them using your case’s thumbscrews.
- Attach the riser cable to your motherboard’s PCIe slot.
- Mount your GPU to the vertical bracket and connect the riser and power cables.
- Ensure there’s adequate clearance between the GPU and the side panel. Overcrowding can hinder airflow, especially in cases where you “grafikkarte vertikal einbauen zu nahme am deckel.”
It’s important to note that third-party kits may block additional PCIe slots on your motherboard, limiting your ability to install other expansion cards.
3. Remote Mounting Brackets
Remote mounting brackets provide the most flexibility, allowing you to place your GPU in unconventional positions. These kits often include extended riser cables and brackets for mounting the GPU to the case’s base or fan mounts.
Steps:
- Remove the GPU from the motherboard and plan the mounting position based on your case layout.
- Secure the remote mounting bracket to the desired location, such as a 120mm fan mount or the case’s floor.
- Attach the riser cable to the motherboard’s PCIe slot and connect it to the GPU.
- Run power cables and video output cables to the GPU, ensuring they are properly routed and not under tension.
- Test the setup to ensure the GPU functions as expected before fully securing the installation.
This method requires careful planning to ensure the riser and power cables are long enough and that video cables can reach the GPU’s output ports. Always test the components beforehand to avoid issues later.
Potential Challenges with Vertical GPU Mounting
While the idea of vertically mounting your GPU is appealing, there are some challenges to keep in mind. One of the most significant concerns is airflow. When you “grafikkarte vertikal einbauen zu nahme am deckel,” the GPU can end up too close to the side panel, restricting air intake. Higher operational temperatures and possible thermal throttling may result from this.
Additionally, riser cables can introduce latency or compatibility issues, although modern riser cables are generally reliable. Ensure you invest in a high-quality cable to minimize these risks.
Another challenge is the limited access to other PCIe slots. Vertical mounting often blocks adjacent slots, making it difficult to install additional components like sound cards or network adapters.
Conclusion
Ultimately, the decision to vertically mount your GPU comes down to personal preference. If aesthetics are a top priority and you’re willing to navigate the potential challenges, it can be a rewarding upgrade to your build. Just make sure to plan carefully, especially if you’re dealing with space constraints or considering “grafikkarte vertikal einbauen zu nahme am deckel.”
By following the steps outlined above and choosing the right tools and components, you can achieve a stunning vertical GPU setup that showcases your PC’s design while maintaining functionality. Whether you use a case with native support, a third-party kit, or a remote mounting bracket, the result is sure to impress.
Unlock premium guest posting opportunities to boost your brand at GuestDraz.com.


Post Comment